How tscircuit works - compiling functional circuits from React code
Breakdown of the extensible framework for the future of electronic design using Typescript and React
tscircuit (github) has seen a rapid growth in new contributors recently, but many are confused on how all the pieces of tscircuit fit together, after all tscircuit has over 100+ repos, each containing a small piece of the puzzle in the form of an npm module. In this article I’ll describe how these modules fit together and why we designed tscircuit as a package ecosystem rather than a monorepo.
Strap in, this is a long one!
What a tscircuit circuit looks like
First, let’s take a look at some tscircuit code:
This board breaks out two pins of a chip and adds a pullup resistor and decoupling capacitor. Here’s what the generated SVG looks like:
Wow okay there’s a lot of magic there! It was able to render out a full circuit board with just a few lines of code. Let’s demystify the magic.
@tscircuit/core: Make classes out of React code
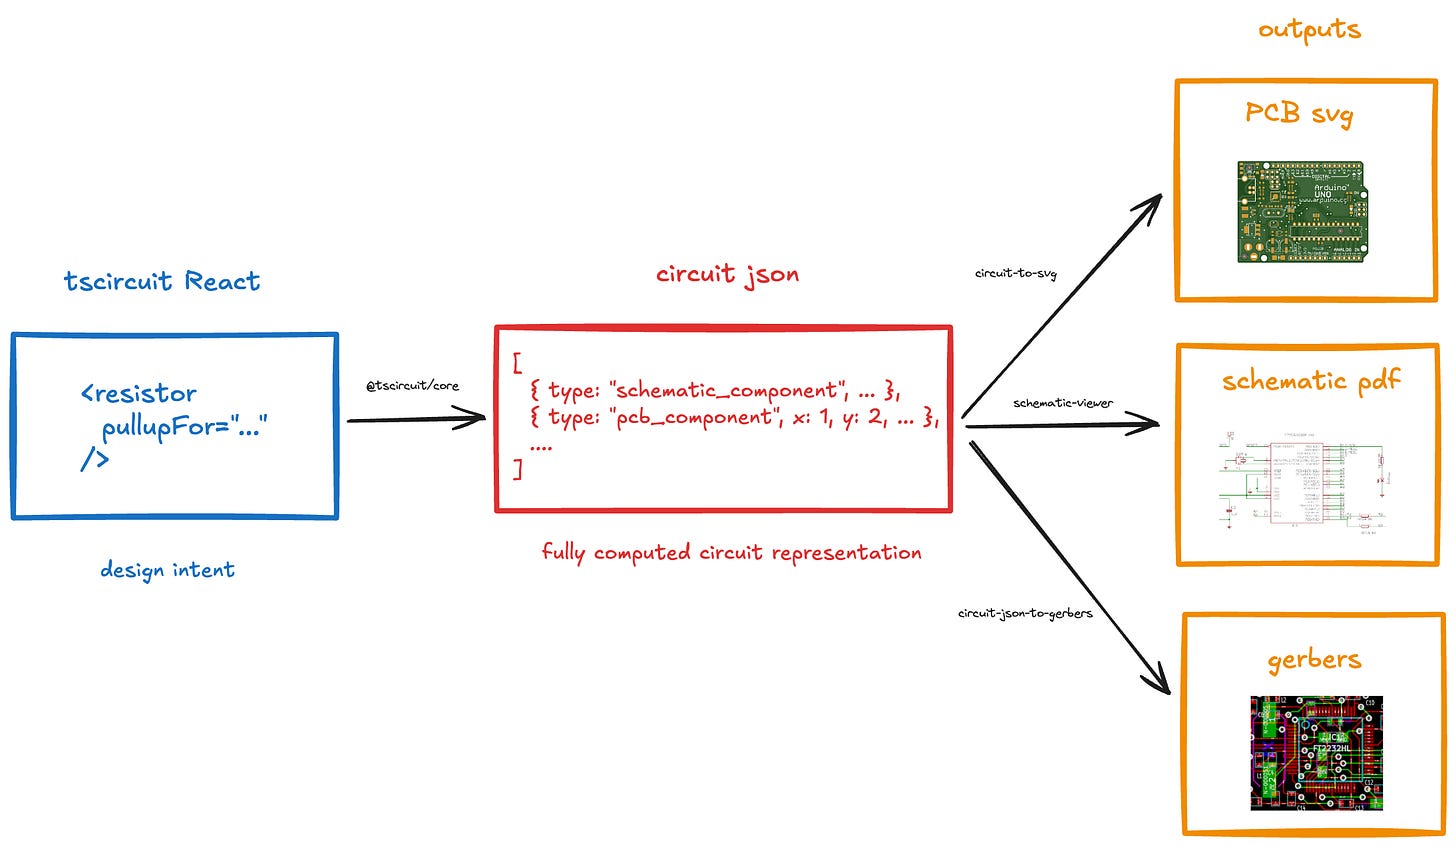
The most important module in tscircuit is @tscircuit/core, it has 2 main jobs:
Convert React into class instances
Run a render pipeline to convert class instances into circuit json
React becomes Class Instances
Let’s focus on that first point for a moment. What is the class instance? For every element in tscircuit, there is a class that implements all the functions related to the component. For example:
project.add(
  <resistor resistance="10k" name="R1" />
)
Is the same as:
project.add(
  new Resistor({ resistance: "10k", name: "R1" })
)
Yes you don’t need to use React to use tscircuit! You can just use Typescript. However, I would recommend everyone who uses tscircuit to use React, because it will be far more modular and compatible with the growing ecosystem of circuit modules.
The Render Pipeline
Ok so we’ve got a bunch of class instances, now what? Now we run the render pipeline! (most of the time when you’re using tscircuit this is being done implicitly in the background)
project.render()This function steps through each phase of the render pipeline and calls the relevant methods on each class. Here are a couple illustrative phases of the render pipeline:
SourceRender
PortMatching
PcbComponentRender
PcbTraceRender
Each class can define a method to modify the Circuit JSON for each phase. For example, for a Resistor class:
doInitialSourceRender- Add{ type: “source_component”, resistance: “10k” }to the Circuit JSONdoInitialPortMatching- Nothing! Most phases don’t need a methoddoInitialPcbComponentRender- Add{ type: “pcb_component” }to the Circuit JSONdoInitialPcbTraceRender- Nothing! This phase is for traces!
Here’s the Resistor doInitialSourceRender phase, project.db is the Circuit JSON array with some utility methods (called circuit-json-util)
New render phases can be added at little cost and are usually added when there’s a dependency or condition from a previous phase. For example, PcbLayout depends on PcbComponents being rendered.
What is Circuit JSON?
Circuit JSON (internally nicknamed “soup”) is a giant JSON array that represents a fully computed circuit. It is basically the middleground between tscircuit and other file formats, we define the Circuit JSON standard using Zod with strict types (docs) (repo) so that people can build their own converters or use any of the great modules we’ve created for converting Circuit JSON into industry-standard file formats.
Converting Circuit JSON into… anything?
We spend a lot of time building converters for Circuit JSON, this is critical for tscircuit to be able to create real functional circuits. Here are some modules that convert to or from circuit json from industry file formats:
circuit-to-svg - Convert to a schematic or PCB SVG representation
circuit-json-to-gerber - Convert to Gerber for PCB manufacturing
specctra-dsn-json - Convert to/from Specctra DSN for autorouting
kicad-mod-converter - Convert kicad footprints to Circuit JSON
Check out the entire kicad library viewer here
footprinter - Convert footprint strings into Circuit JSON (more on this below!)
Excellon drill, Pick’n’place CSV, Bill of Materials CSV, and more!
You can probably see why we chose to have this intermediate JSON format. After you have the JSON, there’s a million converters to build out! Having them each in their own module helps to simplify testing.
What are these footprint strings?
Footprint strings are a great way to simplify tscircuit code. They look like this:
<resistor resistance="10k" footprint="0402" />The string above is called a “footprinter string” and it converts automatically into a bunch of elements, this is the equivalent code:
<resistor
  resistance="10k"
  footprint={
    <footprint>
      <smtpad pcbX="-0.2mm" pcbY={0} width="2mm" height="4mm" />
      <smtpad pcbX="0.2mm" pcbY={0} width="2mm" height="4mm" />
    </footprint>
  }
/>
That’s a lot less readable! Footprinter strings come in handy when defining huge component footprints like a BGA component with 64 pins, or a Quad Flat Package with 48 pins. But how do you know it’s accurate?
A footprinter string is actually a mini-DSL (Domain Specific Language) for defining footprints. You can customize all the dimensions of a footprinter string just by adding underscores, for example, this is a “qfp48_w14_p1mm”, a Quad Flat Package with a width of 14mm and a pitch of 1mm:
Don’t want to learn a custom DSL? You don’t have to! We’ve trained an AI that can convert human text or datasheet descriptions into footprinter strings. It’s free to use online at text-to-footprint.tscircuit.com
We’re always looking for help adding new footprints to the DSL, ideally we’re able to represent nearly every kind of standardized component, you can find a list of outstanding missing footprints here!
Using footprinter strings has an additional benefit, they can also be used to generate 3d models! More on that below!
3d in tscircuit
This is a complicated subject because there was a lack of infrastructure for generated CAD that we needed to build out. Generally, you can just link to a cadModel to have tscircuit load it in for a particular component
There are also ways to process the cadModel a bit before loading in, you can give an object to specify a rotationOffset, for example. But this is all quite clunky because these 3d models are often not available or time consuming to come by, why can’t we have our models in code?
jscad-fiber: Create 3d models in React
We created a React fiber layer for the awesome jscad project (try their playground!) to allow the creation of 3d models with React. Here’s an example of what that looks like:
Now that we can create models in React, we need to create a library of electronics components and utilities to make it easier to create electronics models, introducing…
jscad-electronics: Create 3d electronics models with React
We needed a common library of electronics components, so we began building a bunch of React components for representing everything that footprinter could represent, but in 3d! All of that is then packaged up into the jscad-electronics repo, check out all the components we’ve built online here!
jscad-planner: A JSON format for transferring jscad models
Ok, now we need to find a way to convert these beautiful react models into something that can go inside Circuit JSON. This is where jscad-planner comes in! jscad-planner takes everything that would normally be run against a JSCAD global and converts it into a nice JSON object.
Bringing it all together: React inside components and automatic 3d models
The goal of all of this is to enable 1) automatic 3d models from footprinter strings, and 2) for custom 3d models to be specified in React like this:
import { ChipBody } from "jscad-electronics"

<chip
  name="U1"
  footprint="soic8"
  cadModel={
    <jscad>
      <ChipBody
        width="0.5mm"
        length="0.5mm"
        height="0.1mm"
      />
    </jscad>
  }
/>
Phew, that’s enough on 3d for now. Our efforts there are ongoing and it’s quite a hurdle. If you’re interested in contributing, we’d love to connect on discord!
Autorouting
Autorouting is the process of automatically connecting pins on the chips together to form an electrical connection. The connection is called a “trace” and is “printed” (etched) onto a circuit board.
tscircuit always autoroutes boards. We believe that drawing thousands of lines is a task for robots not humans. However, using the tscircuit dev tool (tsci dev) you can easily create hints to guide the autorouter to do what you want.
Building an Ecosystem for Autorouters
There are a few great autorouters out there, but only one great open-source autorouter as far as I know. It’s called freerouting and it’s a GPL Java application. tscircuit sponsors the maintenance and development of the project, and we’re hopeful that in a future version we’ll get an integration with them.
We want people to build more autorouters, and we’re building autorouters ourselves with an emphasis on speed for realtime previews. We recently released a new autorouter called the ijump-astar-autorouter which will be shipping by default in the next minor version of tscircuit.
We’ve released a huge dataset of autorouting problems and an open-source development environment for building autorouting algorithms. If you love algorithms, help us build an autorouter! It’s fun!!
@tscircuit/cli the command line and dev tool
The tscircuit CLI (command line interface) and the bundled preview tools are incredibly powerful. Just run tsci dev in a directory and you’ll get a web preview of an automatically initialized project. You can click between schematic, PCB, and 3d previews. It’s pretty great!
The web environment has most of the things you can do via the CLI, like exporting your circuit to different file formats for manufacturing, such as Gerbers, Pick’n’Place CSVs, or Circuit JSON!
The tscircuit Registry (just an npm registry)
tscircuit implements the NPM Registry API, to use it just do tsci add someuser/somepackage . To publish a package, just run tsci publish in your project’s directory. You can see a list of recent packages here.

Why not use the npm registry? We want to do a couple things differently, notably we want there to be really good previews and supply-chain analysis of parts using in each design. If you want to keep using npm, you’re more than welcome to and it’ll work perfectly!
Why a package ecosystem?
The choice to make tscircuit a package ecosystem is based on the success of NPM for getting people to participate in open-source development and contribution. Understanding a monorepo can be very challenging because of the layers of process just to run and understand the system. In addition, the tooling for running testing and project-specific linting would be fairly complex to contain all 100+ of tscircuit’s modules.
tscircuit is structured as a system of modules that are all imported and exposed via the central tscircuit package, this allows people to isolate their understanding to a relatively small chunk, e.g. Circuit JSON to Gerber requires no understanding of React, but still gives us a strong standard library.
Why all MIT-licensed?
I believe foundational technologies have to be permissively licensed to take root and enable next-generation innovation. Corporations can be huge contributors and inspirations for open-source but they steer clear of non-permissive licenses.
That’s all for now!
Hopefully this was a good introduction to the tscircuit architecture, please give us a star on Github, follow me on twitter or subscribe below.


guten tag!!